

Tuning up MTU (Maximum Transmission Unit) to speed up Internet access
Now let me tell you one important fact related with tuning. Value of MTU depends upon how fast a connection you have, what kind of activities you perform (ask yourself a question. Are your a mild, average or high end user of Internet ? To put it in other words, Do you download little or nothing, or are an average surfer or are Internet savvy individual and download everything from programs,apps,patches to watching Internet audio/video real-time content?) Depending upon who you are as a user and what kind of connection (modem,dsl,cable or in rare cases T1/T3), this tuning may have little to significant effect on your Internet experience. All right MTU stand for Maximum Transmission Unit.
Value of MTU decides the size of Internet data packet. Bigger the size, more you can transfer.
Analogy could be made with a bucket. If bucket is small, you can carry little but it would be no strain on your strength. Bigger the bucket, more you can carry but it strains your physical strength. (Well! Its not that simple but good enough to understand). Objective should be find a perfect balance which works for you. I think maximum that you can put is as value of MTU is 1500 (but could be higher for your specific network) and it may not make sense making it smaller than 68.
Again this is a registry tweak unless and until you have a tweaking utility that can do it for you.
Open Registry by going to START-RUN and entering REGEDIT and Navigate to HKEY_LOCAL_MACHINE\SYSTEM\CurrentControlSet\Servic es\Tcpip\Parameters\Interfaces\ ID for Adapter. For this right click on right pane and add a key by the name MTU. For this key you can add a DWORD value from 68 to 1500 (or higher value is certain cases).
If you put less than 68, it will default to 68. If you put a value higher than 1500 or your Network permitted max, it will default to permitted max.
Enable automatic path MTU size detection and impro
================================================== ================
As stated on previous tip (Tip 52), MTP size plays an important role in deciding Internet speed. But its not so easy to determine the right value of MTU. For those of us who fall in this category and would prefer computer to find that for us, follow trick may work. I can not say with confidence whether this would work across all network but it should and there is no harm in trying it out. Now before I do that let me tell you what this action will do.
Applying this trick, you would ask computer to automatically find out the maximum MTU size possible in the connection path to a host. This value could be different for different sites. I think this trick should pick the lowest common denominator across a particular path. Typically If MTU size is not optimized, this job has to be done by a router which would mean a significant waste of time (small chunks adds to a considerable loss if you imagine that there are billions of packets involved across the whole Internet) resulting in poor throughout and congestion on cyber lanes. All right this key is called EnablePMTUDiscovery.
Again this is a registry.Open Registry by going to START-RUN and entering REGEDIT and Navigate to HKEY_LOCAL_MACHINE\SYSTEM\CurrentControlSet\Servic es\Tcpip\Parameters\Interfaces\ ID for Adapter. For this right click on right pane and add a key by the name EnablePMTUDiscovery. For this key you can add a DWORD boolean value of 0 or 1 with 1 being TRUE (value that enables auto detection).
Since we are trying this tweak, set to 1 and enable the TCP to attempt to discover the MTU size over the specific path to host.
Microsoft has an interesting article on many similar tips
Code:
TCP/IP and NetBT configuration parameters for Windows 2000 or Windows NThttp://support.microsoft.com/default.aspx?scid=kb;EN-US;q120642
and is titled TCP/IP and NBT Configuration Parameters for Windows (Q120642).
Code:
TCP/IP and NetBT configuration parameters for Windows 2000 or Windows NThttp://support.microsoft.com/default.aspx?scid=kb;EN-US;q120642
For BSNL Dataone broadband 1480 ~1500 should give u the best values.
im using smartbro & my internet speed gets better
Look for program called TCPOptimizer.exe
this is the easy way

For windows XP,
a few clicks and its done,
it will even auto find the max MTU for your pc,
normally 1500 is the normal setting though.
1/2/3 And reboot

~~~>link

http://www.2shared.com/file/5207462/...Optimizer.html
Memory Card CORRUPTED! Here is the solution.
Hey, your mmc got corrupted, going to buy a new one? Stop here and see it. you can try to repair it.
All the memory card are based on the FAT file system and not the FAT32
or NTFS file system. for repairing you will need a corrupted mmc, a mmc
reader, and a PC, obviously.
1) Insert your card in the mmc reader.
2) Find the drive in which it is inserted from your pc.
3) Right click the selected drive and select FORMAT but NOT quick format.
4) Now, in the file system selection part, select the file system to be FAT and not FAT 32 or NTFS file system.
5) Start formatting.
You can also do this by using Windows Explorer.
HAPPY FORMATTING!
pendrive (usb / flashdrive) changed to RAW from NTFS and wimndows cant format it
go to control panel
go to administrative tools
go to computer management
go to disk management on the selected drive right click then format
next select on the file system FAT

Spyware.IEMonster Removal Guide
Do you know what Spyware.IEMonster is?
DESCRIPTION
Spyware.IEMonster is a browser hijacker that is also known as Spyware.IEMonster.b and it’s purpose is to promote XPAntivirus, a well known rogue anti-spyware application. Spyware.IEMonster performs devious activities on an infected computer by creating shortcuts to BDSM galleries and uncensored porn which cannot be removed. If the shortcuts are removed they will recreate themselves. This makes Spyware.IEMonster a devilish monster and nuisance to any computer user.
Spyware.IEMonster may generate fake system security alert balloons in the system tray that reads:
WINDOWS ALERT:Critical Systems Warning!
Your system is probably infected with version of Spyware.IEMonster.b
Spyware.IEMonster.b is spyware that attempts to steal passwords from Internet
Explorer, Mozilla Firefox Outlook and other programs, including logings and
passwords from online baking sessions,EBay, PayPal. It may also create special
tracking files to log your activity and compromise your Internet privacy.
Spyware.IEMonster then sends stolen passwords and other sensitive information
to a php script at a pre specified website where stolen details are logged
Click here to protect your computer (recommended) ok or cancel.
In non-techie terms: If the notification message that Spyware.IEMonster generates is clicked on it may open your web browser and point it to the XPAntivirus download page. If a computer user downloads the XPAntivirus rogue anti-spyware program they will further their issues by infecting their computer with another parasite. Spyware.IEMonster may be your worst nightmare if it is not removed as soon as possible.
Aliases: Spyware.IEMonster, Spyware.IEMonster.b, Spyware IEMonster, IEMonster, Zlob.PornAdvertiser.ba
Spyware.IEMonster Automatic Removal Instructions
This automatic removal method is for non-techie computer users. If you’re
too lazy to learn about spyware removal or how to access sensitive files in
your computer, then this is the method for you.
Before you start: Print or bookmark these instructions because you’ll
have to reboot into Safe Mode. Also back up your computer in case
you make a mistake.
- Download and save SmitFraudFix to your desktop.
- Restart
your computer in Safe Mode (how to do safe mode).
Once the
desktop appears, double click on the SmitfraudFix.exe on your desktop. - After the
credits screen, you’ll see a menu. Select the option number 2,
which is ‘Clean (safe mode recommended)’, and then
press Enter to delete infect files. - SmitFraudFix will begin cleaning your computer and take a series of cleanup processes. When the process is over, it will automatically begin the Disk Cleanup program.
- Once the Disk Cleanup program is complete, you will be prompted with the message ‘Registry cleaning - Do you want to clean the registry’. Answer Y (Yes) and hit Enter. Reboot your computer.
- SmitFraudFix
will now check if wininet.dll is infected. SmitFraudFix will ask you
whether to replace the infected file (if there’s any) ‘Replace infected
file?’ Answer by typing Y (Yes) and hit Enter. - Reboot your computer to complete the cleaning process.
- After
reboot, a Notepad screen may appear containing a log of all the files
removed from your computer. If it doesn’t appear, a file will be created called
rapport.txt in the root of your drive, (Local Disk C:). - Restart your computer in Safe Mode (how to do safe mode).
- Go to C:\Windows\Temp,
click Edit, click Select All, press DELETE, and then
click Yes to confirm that you want all the items to go to the Recycle Bin. - Go to C:\Documents
and Settings\[LISTED USER]\Local Settings\Temp, click Edit,
click Select All, press DELETE, and then click Yes to
confirm that
you want all the items to go to the Recycle Bin. - Reboot your computer back to normal mode. Go to Windows Update and download all critical updates.
Spyware.IEMonster Manual Removal Instructions
This manual removal method is for techie computer users. Spyware.IEMonster manual removal may be difficult and time consuming to remove. There’s no guarantee that Spyware.IEMonster will be removed completely. So read the Spyware.IEMonster removal steps carefully and good luck.
Before you start: Close all programs and Internet browsers. Also back up your computer in case you make a mistake and your computer stops working.
- Uninstall
Spyware.IEMonster Program
Click on Start > Settings > Control Panel > Double-click on Add/Remove Programs. Search for and uninstall Spyware.IEMonster if found. - To stop
Spyware.IEMonster processes (view process removal steps)
Go to Start > Run > type taskmgr. The click the Processes tab and you’ll see a list of running processes.
Search and stop these Spyware.IEMonster processes:
Spyware.IEMonster.exe
For each unwanted process, right-click on it and then select “End task”. - To
Unregister Spyware.IEMonster DLLs (view DLL removal steps)
Search and unregister these Spyware.IEMonster DLLs:
Spyware.IEMonster.dll
To locate the Spyware.IEMonster DLL path, go to Start > Search > All Files or Folders. Type Spyware.IEMonster and in the Look in: select either My Computer or Local Hard Drives. Click the Search button.
Once you have the Spyware.IEMonster DLL path, go to Start and then click on Run. In the Run command box, type cmd, and then click on OK.
To locate the exact DLL path, type cd in order to change the current directory. To display the contents of the directory, use the dir command. To remove the DLL file type regsvr32 /u FILENAME.dll (FILENAME is the name of the file that you want to unregister). - To
unregister Spyware.IEMonster registry keys (view registry keys removal
steps)
Go to Start > Run > type regedit > press OK.
Edit the value (on the right pane) by right-clicking on it and selecting the Modify option. Select the Delete option.
Search and delete these Spyware.IEMonster registry keys:
- If your homepage has been changed, go to Start > Control Panel > Internet Options > click on the General > click Use Default under Home Page. Add the your desired default homepage, then click Apply > click OK. Open a new web browser to check that you have your desired default homepage.
- Remove
Spyware.IEMonster Directories.
To find Spyware.IEMonster directories, go to Start > My Computer > Local Disk (C:) > Program Files > Show the contents of this folder.
Right-click on the Spyware.IEMonster folder and select Delete.
A message will appear saying ‘Are you sure you
want to remove the folder Spyware.IEMonster and move all its contents to the
Recycle Bin?’, click Yes.
Another message will appear saying ‘Renaming, moving or deleting
Spyware.IEMonster could make some programs not work. Are you sure you want to
do this?’, click Yes.
- To remove Spyware.IEMonster icons on your Desktop, drag and drop them to the Recycle Bin.
You’ve completed the Spyware.IEMonster manual removal instructions!
I hope this article has helped you solve your Spyware.IEMonster problems. If
you want to contribute to this article, post your comment below.
Disclaimer: This article is for educational purposes. By using this information you agree to be bound by the disclaimer. There’s no guarantee that Spyware.IEMonster will be completely removed from your computer. Seek professional help if your computer continues to experience problems.
yahoo messenger emoticons  |
:) |
happy |
 |
:( | sad |
 |
;) | winking |
|
:D | big grin |
 |
;;) | batting eyelashes |
 |
>:D< | big hug |
|
:-/ | confused |
 |
:x | love struck |
 |
:"> | blushing |
 |
:P | tongue |
 |
:-* | kiss |
 |
=(( | broken heart |
 |
:-O | surprise |
 |
X( | angry |
 |
:> | smug |
 |
B-) | cool |
 |
:-S | worried |
 |
#:-S | whew! |
 |
>:) | devil |
|
:(( | crying |
 |
:)) | laughing |
| Emoticon | Key Combination | Description |
|---|---|---|
 |
:| | straight face |
 |
/:) | raised eyebrows |
 |
=)) | rolling on the floor |
 |
O:-) | angel |
|
:-B | nerd |
 |
=; | talk to the hand |
 |
:-c | call me |
 |
:)] | on the phone |
 |
~X( | at wits' end |
 |
:-h | wave |
 |
:-t | time out |
 |
8-> | day dreaming |
 |
I-) | sleepy |
 |
8-| | rolling eyes |
 |
L-) | loser |
 |
:-& | sick |
 |
:-$ | don't tell anyone |
 |
[-( | no talking |
 |
:O) | clown |
 |
8-} | silly |
 |
<:-P | party |
| Emoticon | Key Combination | Description |
|---|---|---|
 |
(:| | yawn |
 |
=P~ | drooling |
 |
:-? | thinking |
 |
#-o | d'oh |
 |
=D> | applause |
 |
:-SS | nail biting |
 |
@-) | hypnotized |
 |
:^o | liar |
 |
:-w | waiting |
 |
:-< | sigh |
 |
>:P | phbbbbt |
 |
<):) | cowboy |
 |
X_X | I don't want to see |
 |
:!! | hurry up! |
 |
\m/ | rock on! |
 |
:-q | thumbs down |
 |
:-bd | thumbs up |
 |
^#(^ | it wasn't me |
 |
:ar! | pirate* |
Want to send hidden emoticons?
* Only available in Yahoo! Messenger for the Web.
UNLOCKER 1.8.6
Freeware
WinAll
Description
Unlocker helps delete locked files with error messages like:
- Cannot delete file: Access is denied
- There has been a sharing violation.
- The source or destination file may be in use.
- The file is in use by another program or user.
- Make sure the disk is not full or write-protected and that
DOWNLOAD LINK!
http://www.4shared.com/file/43800171/318fd819/unlocker186.html
unlocker1.8.7
# Ever had such an annoying message given by Windows?
It has many other flavors:
Cannot delete file: Access is denied
There has been a sharing violation.
The source or destination file may be in use.
The file is in use by another program or user.
Make sure the disk is not full or write-protected and that the file is not
currently in use.
# Unlocker is the solution!
Click this bar to view the full image.
1. Simply right click the folder or file and select Unlocker
2. If the folder or file is locked, a window listing of lockers will appear
Click this bar to view the full image.
3. Simply click Unlock All and you are done!
Download the latest version for Windows 2000 / XP / 2003 / Vista - Unlocker is
Freeware
HOME PAGE
http://ccollomb.free.fr/unlocker
download
http://ccollomb.free.fr/unlocker/unlocker1.8.7.exe
before doing the following, please kindly close all running program
update AVG then run it---
clean what it can find--
then kill the process from the memory.
1.Bring up the Task Manager by pressing 'Control-Alt-Delete (Ctr-Alt-Del)' ,
2.Click on the Processes tab.
3. Look for Wscript.exe from the list and select it
4. Press End Process
This will prevent the virus from writing itself on the drive again after you delete it (next steps)
Open the Infected Drive
- If you right click your drive and see something like the figure above,
the best and safest way to access it, is: From the start menu click Run…:
On the text box type the infected drive letter - e.g C: and press the Enter key
View the hidden Files
From the main menu select Folder Options

- Then Click the View Tab.
- Then Select Show hidden files and folders
- Then uncheck Hide protected operating system files

Delete the Autorun.inf and the three files with bungoton names.
"bungoton.bat"
"bungoton.vbs"
"bungoton.reg"
(Other known variants: bungoton.vbs,bunguton,bat, bunguton.reg and kulitot.vbs, kulitot.bat, kulitot.reg)
if u cant see dthe file BUNGOTON try to search it
(click start ---> search ---> All files and folder ---- type BUNGOTON
For safety reasons, go to Folder options again and View Tab and select Do not Show hidden files and folders
and Check Hide protected operating system files
Hope it will help
Changing the Windows Boot Screen
I'll start with the Windows boot screen, since that's fairly easy and doesn't necessarily require any direct modification of system files. There are several ways to approach changing the boot screen. One option is to eliminate it completely, opting to display a blank screen until Windows completes the boot process. To turn off the boot logo, Click Start > Run and type MSCONFIG in the run dialog box to launch the System Configuration Utility. On the BOOT.INI tab, check the box next to /NOGUIBOOT and click OK. The next time you reboot your computer, you'll see the BIOS screen and then nothing until Windows loads completely. The downside to this option is you won't get any feedback if your PC gets hung up somewhere in the boot process.

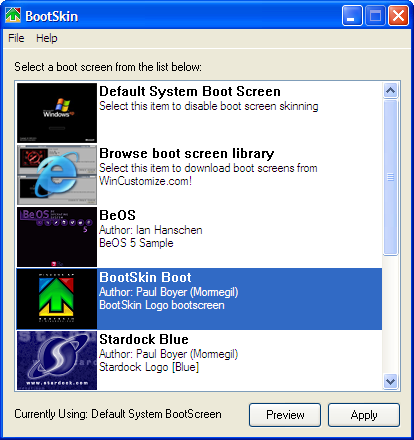
To maintain a more visual boot process, while also eliminating any boot branding, you might simply want to replace the boot image. The easy way to do this is to download a freeware app from WinCustomize called BootSkin. The app automatically overrides the default Windows boot screen, replacing it with one of the many options in the WinCustomize BootSkin library. With some practice you can make your own custom BootSkin as well.
If you want to get really geeky, a third option is to edit the
operating system file where the boot screen information resides. You
need to be careful in doing this or you can end up with a computer that
won't boot. The first part of the process is to create or find an image
you want to use. If your computer simply has the all black Windows XP
boot screen, with the XP logo like the one pictured below, you don't
need a very large image.
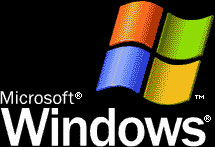
Simply create a 215x147 .bmp file with 16 colors (NOT 16-bit) in any image editor and you've got a working replacement. If your computer manufacturer overrides this default screen with something else, you may need to get creative to eliminate all the branding. In general, using a black background looks more consistent, but you can use any of the 16 colors in your palette.
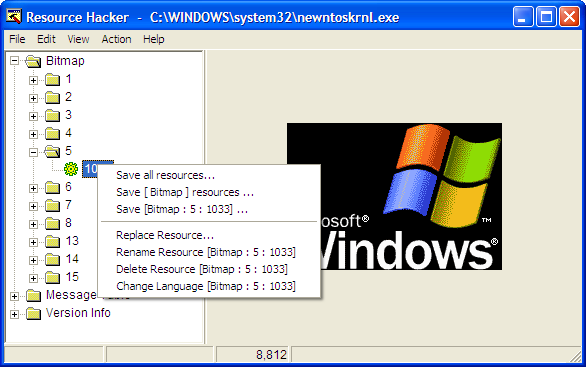
With your new image created, you need a freeware app called Resource Hacker to make some changes.
Before proceeding, locate ntoskrnl.exe in your Windows > system32 folder. Make a copy of the file called newntoskrnl.exe or something equally easy to remember and leave the copy in the system32 folder.
Make a second copy of the ntoskrnl.exe on your desktop (this is the one you will edit).
Open ntoskrnl.exe in Resource Hacker. Expand Bitmap > 5 and highlight the 1033 folder. Right-click the 1033 icon and choose Replace Resource.
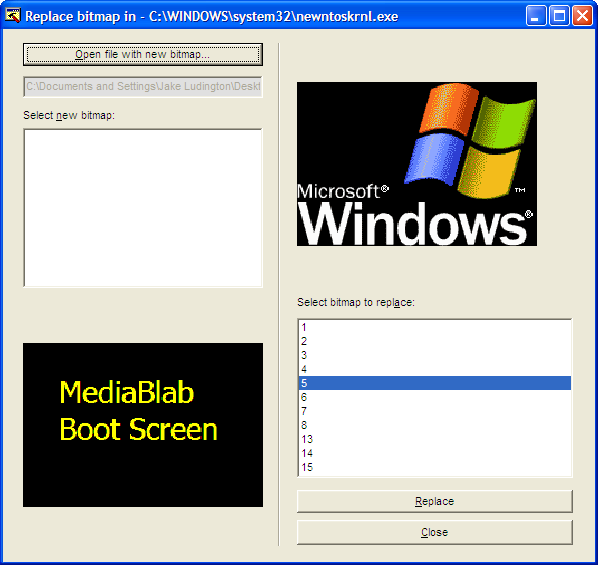
Click the Open file with new bitmap button and locate the image you created earlier. Click the Replace button. Save and exit Resource Hacker. You can optionally replace all elements of the boot screen by editing each portion of the Bitmap.
Reboot into SafeMode and copy your newly created ntoskrnl.exe file into the Windows > system32 folder.
Note: If you are using Windows 2000, you can simply replace the image in the Bitmap > 1 > 1033 location with a 640x480 16 color Bitmap to modify the Win2k boot screen in a similar fashion.
Changing the BIOS Splash Screen
To eliminate the branded splash screen associated with your BIOS, you need to obtain the firmware update for your BIOS and edit the logo file that's part of the BIOS fileset before applying the update. Since every computer model and manufacturer uses a slightly different BIOS configuration, it's important to get the BIOS specific to your computer from the support section of the manufacturer's Website. In some cases, like my HP laptop, it's become virtually impossible to replace the logo because the BIOS flash process is contained in an .exe file that runs locally in Windows rather than from a separate disk.
Assuming your PC manufacturer has you create a floppy designed to flash the PC bios, you can fairly easily make a change to the logo displayed. In following the directions to create the BIOS boot disk, simply replace the included logo.bmp file in the BIOS update package with a logo.bmp file created by you. The key here is to use a 16 color (NOT 16-bit color) 640x480 BMP file. Copy your logo.bmp file onto the disk used for your BIOS update and run the bundled logo.bat file by double-clicking it. This converts the logo.bmp to a format ready for the BIOS update.
It's vital to keep all the files in the BIOS update named exactly as they were or your computer may not work after the update. Any changes made to BIOS update files should be done at your own risk and with extreme care.
Have you ever noticed that when you visit some web site, there is an icon small (little) image that shows (appears) at the top of your browser?
If you have, today you are going to learn how to install an icon picture for your web site, so when users visit your website, you can put your logo. Even better when a visitor bookmarks your url, the browser automatically saves in their favorites to identify your site.

Here is how to do this:
1. If you have windows, open paint. You can find it in:
Start > Programs > Accessories
2. Set the dimensions to 24x24 pixels: in Image > Attributes (Control - E)
3. Set Width to 24 and Height to 24 and Click Ok.
4. To help you create and edit your image better, zoom paint to the highest zoom which is 800%.
To do this, go to View > Zoom > Custom and Select 800%
5. Create your logo or whatever you want your icon to look like:
6. After you have created your image, save as "favicon.ico"
7. Now all you have to do is upload the favicon.ico image to your website root directory. The root directory is the main folder where all your files reside at, like your main index page. Some hosting companies will provide a directory called "html" or "public" or "web" "public_html". You MUST upload to your website root directory, otherwise, your browser will look for the favicon.ico image, will not find it and it will not display it on your browser.
put the following HTML code in between your <head> tags with the follwowing code:
Code:
8. Now that you have uploaded to your root directory, you are done.
DEMO: http://www.wallpaperama.com/favicon.ico
NOTE: There might other easy ways to do this, but this is the only way I know of. If you have a better suggestion, please help us by posting it here.
OKey lets discuss the Activation code for XP. Microsoft has already improved their anti piracy security by using the internet in activating Windows XP and other of their future products. If your operating system is not activated then you will never received updates, and technical support from Microsoft. The process of the activation is simple. Once the operating system is installed in a specific hardware and activated using the internet then when you change your hardware for example motherboard and reformat your harddisk once you reactuvate your XP it won't allow you coz the configuration of your PC stored in the wpa.dbl and wpa.bak will not match with your first hardware or motherboard wherein you installed your XP. So that is the drawback of Microsoft's Windows XP licensing. Once you have changed your motherboard or the old one got busted then you will have a problem.
Below are the steps on how to reinstall Windows XP without having to reactivate with microsoft;
Users who reformat their hard drive and perform a clean installation of the operating system will find that they need to reactivate the product. But, as long as the new installation is on the same system and there won't be any hardware changes it is possible to transfer the existing product activation and skip having to go through the product activation process again. Follow the steps below to save the activation status information and restore it once your system is rebuilt:
1. Double-click My Computer
2. Double-click on the "C" drive
3. Go to the C:\Windows\System32 folder (you may have to click on the link that says "Show The contents of this folder")
4. Find the files "wpa.dbl" and "wpa.bak" and copy them to a safe location. You can copy them on a floppy drive or burn it onto a CD or DVD.
5. After you have reinstalled Windows XP on your reformatted hard drive, click "No" when asked if you want to go ahead and go through the activation process
6. Reboot your computer into SafeMode (you can either press F8 as Windows is booting up to see the Windows Advanced Options menu and select SAFEBOOT_OPTION=Minimal or follow the instructions in Starting Windows XP in SafeMode
7. Double-click My Computer
8. Double-click on the "C" drive
9. Go to the C:\Windows\System32 folder (you may have to click on the link that says "Show The contents of this folder")
10. Find the file "wpa.dbl" and "wpa.bak" (if it exists) and rename them to "wpadbl.new" and "wpabak.new"
11. Copy your original "wpa.dbl" and "wpa.bak" files from your floppy disk, CD or DVD into the C:\Windows\System32 folder
12. Restart your system (if you followed the directions in Starting Windows XP in SafeMode you may need to go back into MSCONFIG to turn off booting into SafeMode)
Voila! Your Windows XP operating system is now reinstalled on your reformatted hard drive and you are all activated without having to actually go through the product activation process!
Remember though. This won't work for transferring activation information from one computer to another or if you alter the hardware because the information contained in your "wpa.dbl" file will not match the configuration of the computer. This trick is only for reinstalling Windows XP on the exact same computer after formatting the hard drive.
General keyboard shortcuts
| • | CTRL+C (Copy) |
| • | CTRL+X (Cut) |
| • | CTRL+V (Paste) |
| • | CTRL+Z (Undo) |
| • | DELETE (Delete) |
| • | SHIFT+DELETE (Delete the selected item permanently without placing the item in the Recycle Bin) |
| • | CTRL while dragging an item (Copy the selected item) |
| • | CTRL+SHIFT while dragging an item (Create a shortcut to the selected item) |
| • | F2 key (Rename the selected item) |
| • | CTRL+RIGHT ARROW (Move the insertion point to the beginning of the next word) |
| • | CTRL+LEFT ARROW (Move the insertion point to the beginning of the previous word) |
| • | CTRL+DOWN ARROW (Move the insertion point to the beginning of the next paragraph) |
| • | CTRL+UP ARROW (Move the insertion point to the beginning of the previous paragraph) |
| • | CTRL+SHIFT with any of the arrow keys (Highlight a block of text) |
| • | SHIFT with any of the arrow keys (Select more than one item in a window or on the desktop, or select text in a document) |
| • | CTRL+A (Select all) |
| • | F3 key (Search for a file or a folder) |
| • | ALT+ENTER (View the properties for the selected item) |
| • | ALT+F4 (Close the active item, or quit the active program) |
| • | ALT+ENTER (Display the properties of the selected object) |
| • | ALT+SPACEBAR (Open the shortcut menu for the active window) |
| • | CTRL+F4 (Close the active document in programs that enable you to have multiple documents open simultaneously) |
| • | ALT+TAB (Switch between the open items) |
| • | ALT+ESC (Cycle through items in the order that they had been opened) |
| • | F6 key (Cycle through the screen elements in a window or on the desktop) |
| • | F4 key (Display the Address bar list in My Computer or Windows Explorer) |
| • | SHIFT+F10 (Display the shortcut menu for the selected item) |
| • | ALT+SPACEBAR (Display the System menu for the active window) |
| • | CTRL+ESC (Display the Start menu) |
| • | ALT+Underlined letter in a menu name (Display the corresponding menu) |
| • | Underlined letter in a command name on an open menu (Perform the corresponding command) |
| • | F10 key (Activate the menu bar in the active program) |
| • | RIGHT ARROW (Open the next menu to the right, or open a submenu) |
| • | LEFT ARROW (Open the next menu to the left, or close a submenu) |
| • | F5 key (Update the active window) |
| • | BACKSPACE (View the folder one level up in My Computer or Windows Explorer) |
| • | ESC (Cancel the current task) |
| • | SHIFT when you insert a CD-ROM into the CD-ROM drive (Prevent the CD-ROM from automatically playing) |
| • | CTRL+SHIFT+ESC (Open Task Manager) |
Dialog box keyboard shortcuts
If you press SHIFT+F8 in extended selection list boxes, you enable extended selection mode. In this mode, you can use an arrow key to move a cursor without changing the selection. You can press CTRL+SPACEBAR or SHIFT+SPACEBAR to adjust the selection. To cancel extended selection mode, press SHIFT+F8 again. Extended selection mode cancels itself when you move the focus to another control.| • | CTRL+TAB (Move forward through the tabs) |
| • | CTRL+SHIFT+TAB (Move backward through the tabs) |
| • | TAB (Move forward through the options) |
| • | SHIFT+TAB (Move backward through the options) |
| • | ALT+Underlined letter (Perform the corresponding command or select the corresponding option) |
| • | ENTER (Perform the command for the active option or button) |
| • | SPACEBAR (Select or clear the check box if the active option is a check box) |
| • | Arrow keys (Select a button if the active option is a group of option buttons) |
| • | F1 key (Display Help) |
| • | F4 key (Display the items in the active list) |
| • | BACKSPACE (Open a folder one level up if a folder is selected in the Save As or Open dialog box) |
Microsoft natural keyboard shortcuts
| • | Windows Logo (Display or hide the Start menu) |
| • | Windows Logo+BREAK (Display the System Properties dialog box) |
| • | Windows Logo+D (Display the desktop) |
| • | Windows Logo+M (Minimize all of the windows) |
| • | Windows Logo+SHIFT+M (Restore the minimized windows) |
| • | Windows Logo+E (Open My Computer) |
| • | Windows Logo+F (Search for a file or a folder) |
| • | CTRL+Windows Logo+F (Search for computers) |
| • | Windows Logo+F1 (Display Windows Help) |
| • | Windows Logo+ L (Lock the keyboard) |
| • | Windows Logo+R (Open the Run dialog box) |
| • | Windows Logo+U (Open Utility Manager) |
Accessibility keyboard shortcuts
| • | Right SHIFT for eight seconds (Switch FilterKeys either on or off) |
| • | Left ALT+left SHIFT+PRINT SCREEN (Switch High Contrast either on or off) |
| • | Left ALT+left SHIFT+NUM LOCK (Switch the MouseKeys either on or off) |
| • | SHIFT five times (Switch the StickyKeys either on or off) |
| • | NUM LOCK for five seconds (Switch the ToggleKeys either on or off) |
| • | Windows Logo +U (Open Utility Manager) |
Windows Explorer keyboard shortcuts
| • | END (Display the bottom of the active window) |
| • | HOME (Display the top of the active window) |
| • | NUM LOCK+Asterisk sign (*) (Display all of the subfolders that are under the selected folder) |
| • | NUM LOCK+Plus sign (+) (Display the contents of the selected folder) |
| • | NUM LOCK+Minus sign (-) (Collapse the selected folder) |
| • | LEFT ARROW (Collapse the current selection if it is expanded, or select the parent folder) |
| • | RIGHT ARROW (Display the current selection if it is collapsed, or select the first subfolder) |
Shortcut keys for Character Map
After you double-click a character on the grid of characters, you can move through the grid by using the keyboard shortcuts:| • | RIGHT ARROW (Move to the right or to the beginning of the next line) |
| • | LEFT ARROW (Move to the left or to the end of the previous line) |
| • | UP ARROW (Move up one row) |
| • | DOWN ARROW (Move down one row) |
| • | PAGE UP (Move up one screen at a time) |
| • | PAGE DOWN (Move down one screen at a time) |
| • | HOME (Move to the beginning of the line) |
| • | END (Move to the end of the line) |
| • | CTRL+HOME (Move to the first character) |
| • | CTRL+END (Move to the last character) |
| • | SPACEBAR (Switch between Enlarged and Normal mode when a character is selected) |
Microsoft Management Console (MMC) main window keyboard shortcuts
| • | CTRL+O (Open a saved console) |
| • | CTRL+N (Open a new console) |
| • | CTRL+S (Save the open console) |
| • | CTRL+M (Add or remove a console item) |
| • | CTRL+W (Open a new window) |
| • | F5 key (Update the content of all console windows) |
| • | ALT+SPACEBAR (Display the MMC window menu) |
| • | ALT+F4 (Close the console) |
| • | ALT+A (Display the Action menu) |
| • | ALT+V (Display the View menu) |
| • | ALT+F (Display the File menu) |
| • | ALT+O (Display the Favorites menu) |
MMC console window keyboard shortcuts
| • | CTRL+P (Print the current page or active pane) |
| • | ALT+Minus sign (-) (Display the window menu for the active console window) |
| • | SHIFT+F10 (Display the Action shortcut menu for the selected item) |
| • | F1 key (Open the Help topic, if any, for the selected item) |
| • | F5 key (Update the content of all console windows) |
| • | CTRL+F10 (Maximize the active console window) |
| • | CTRL+F5 (Restore the active console window) |
| • | ALT+ENTER (Display the Properties dialog box, if any, for the selected item) |
| • | F2 key (Rename the selected item) |
| • | CTRL+F4 (Close the active console window. When a console has only one console window, this shortcut closes the console) |
Remote desktop connection navigation
| • | CTRL+ALT+END (Open the Microsoft Windows NT Security dialog box) |
| • | ALT+PAGE UP (Switch between programs from left to right) |
| • | ALT+PAGE DOWN (Switch between programs from right to left) |
| • | ALT+INSERT (Cycle through the programs in most recently used order) |
| • | ALT+HOME (Display the Start menu) |
| • | CTRL+ALT+BREAK (Switch the client computer between a window and a full screen) |
| • | ALT+DELETE (Display the Windows menu) |
| • | CTRL+ALT+Minus sign (-) (Place a snapshot of the entire client window area on the Terminal server clipboard and provide the same functionality as pressing ALT+PRINT SCREEN on a local computer.) |
| • | CTRL+ALT+Plus sign (+) (Place a snapshot of the active window in the client on the Terminal server clipboard and provide the same functionality as pressing PRINT SCREEN on a local computer.) |
Microsoft Internet Explorer navigation
| • | CTRL+B (Open the Organize Favorites dialog box) |
| • | CTRL+E (Open the Search bar) |
| • | CTRL+F (Start the Find utility) |
| • | CTRL+H (Open the History bar) |
| • | CTRL+I (Open the Favorites bar) |
| • | CTRL+L (Open the Open dialog box) |
| • | CTRL+N (Start another instance of the browser with the same Web address) |
| • | CTRL+O (Open the Open dialog box, the same as CTRL+L) |
| • | CTRL+P (Open the Print dialog box) |
| • | CTRL+R (Update the current Web page) |
| • | CTRL+W (Close the current window) |
Other information
| • | Some keyboard shortcuts may not work if StickyKeys is turned on in Accessibility Options. |
| • | Some of the Terminal Services client shortcuts that are similar to the shortcuts in Remote Desktop Sharing are not available when you use Remote Assistance in Windows XP Home Edition. |
| • | Some of the other Microsoft Knowledge Base articles that
have similar information as this article are:
(http://support.microsoft.com/kb/126449/) Keyboard shortcuts for Windows (http://support.microsoft.com/kb/255090/) Keystroke
navigation in Windows 2000 Help
|
| • | Refer to Help for the most current information regarding keyboard navigation and visit the following Microsoft Accessibility Web site for additional information that relates to keyboard shortcuts and keyboard navigation in Windows and other Microsoft products: |
Solution:
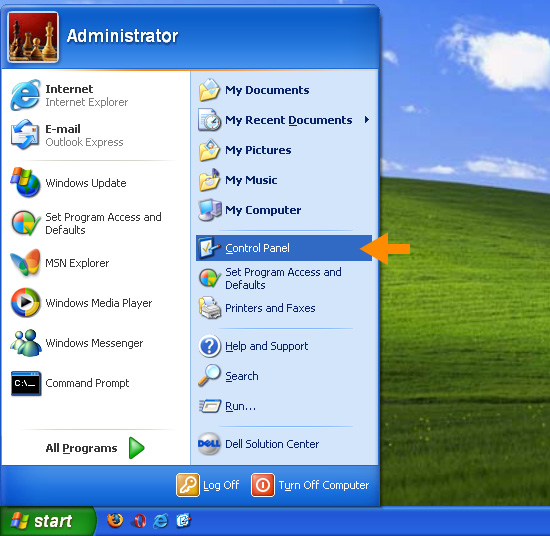
(1) Go to (Start)
(2) Then go to (Control Panel)
(3) Search for (Network and Internet Connections) or (Network Connections) or (Dial-up Connections)
(4) Then you should see two sticking monitor icon, named (Local Area Connection).
Right click on it then choose (Propertise)
(5) Then when you are in the Local Area Connections Properties dialog box,
click on the (Client services for Netware) and it will be highlighted,
then only you'll click (uninstall)
(6) And then for sure you click (YES) that's what you want, right!!!?
(7) Wahlah, if you can follow the steps until here you are finish,
Congratulation, you can proceed to change your settings to the Fast User Switching option or the
Welcome Screen option
1. Select control panel from the start menu
2. Click Network Connections from the Control Panel choices.
3. Choose your connection from the Network Connections window.
4. Click Properties button.
5. Select Internet Protocol (TCP/IP) and click Properties.
6. Click the radio button Use the following DNS server addresses and type in OpenDNS addresses in the Preferred DNS server and Alternate DNS server fields.
Please write down your current DNS settings before switching to OpenDNS, in case you want to return to your old settings for any reason.
Preferred DNS server address for Open DNS is:
- 208.67.222.222
Alternate DNS server address for Open DNS is:
- 208.67.220.220

You can login with multiple ID's on the same yahoo messenger.
Follow these steps : ==>>
* Go to Start ==> Run ==>> Type regedit,hit enter
* Go to HKEY_CURRENT_USER ==>> Software ==>> Yahoo ==>> pager ==>>Test
* On the right pane ==>> right-click and choose new Dword value .
* Rename it as Plural.
* Double click and assign a decimal value of 1.
* Now close registry and restart yahoo messenger.
* For signing in with new id open another messenger .
Symptoms: C: drive has an [autoplay] function when right-clicked. Internet Explorer has
“TAGA LIPA ARE!” in it’s title bar.
Mode of Transfer: USB, Fixed/Portable HDD
Target: Internet Explorer, Registry, MSConfig, Autorun.inf
Effects: Every Mass Storage Device linked to the infected PC will be inserted with an
autorun file which will trigger the Windows
Scripting Service to run its main file “FS6519.dll.vbs”,
which is marked as a system file and is in the root directory of the Drive.
Open My Computer -> Tools Menu -> Folder Options -> View Tab:
Select: Show hidden Files and Folders
Uncheck: Hide Extensions for known file type and Hide Protected operating system
Click Yes Then OK.
You will see an autorun.inf and FS6519.dll.vbs in all your harddrives. Delete ALL of them.
If it says that something is using the program. Press Ctrl+Alt+Del and go to processes, end ALL wscript.exe
Open MSConfig and under startup, uncheck the trojan’s startup entry, [FS6519].
Click Start > Run and then type regedit
delete [HKLM\Software\Microsoft\Windows\CurrentVersion\Run\FS6519]
key, and modify [HKEY_CURRENT_USER\Software\Microsoft\Internet Explorer\Main\Window Title”,
”TAGA LIPA ARE!”]
key to remove the nuisance in IExplorer.
OR go to Edit -> Find and type FS6519.dll.vbs.
Edit the found registry by selecting the name, ryt click and modify,
remove the last two strings which is wscript.exe and FS6519.dll.vbs and click OK.
If finished, press F3 and it will search again for another,
just do the same thing until nothing is found in your registry.
If you are done with the FS6519.dll.vbs, its time for the TAGA LIPA ARE! be edited in your IE,
type the string on the search again then it will show up the IE title
modify then type anything you like or better delete it.
Have a Nice FREE Virus Trojan Day!!!
Im just sharing this stuff....but i guess not applicable, maybe, what do you think?
I've tried this on both Windows XP and Windows 2000, and it has worked.
1. Click on "Start" in the bottom left hand corner of screen
2. Click on "Run"
3. Type in "command" and hit ok
You should now be at an MSDOS prompt screen.
4. Type "ipconfig /release" just like that, and hit "enter"
5. Type "exit" and leave the prompt
6. Right-click on "Network Places" or "My Network Places" on your desktop.
7. Click on "properties"
You should now be on a screen with something titled "Local Area Connection",
or something close to that, and, if you have a network hooked up, all of your other networks.
8. Right click on "Local Area Connection" and click "properties"
9. Double-click on the "Internet Protocol (TCP/IP)" from the list under the "General" tab
10. Click on "Use the following IP address" under the "General" tab
11. Create an IP address (It doesn't matter what it is. I just type 1 and 2 until i fill the area up).
12. Press "Tab" and it should automatically fill in the "Subnet Mask" section with default numbers.
13. Hit the "Ok" button here
14. Hit the "Ok" button again
You should now be back to the "Local Area Connection" screen.[/b]
15. Right-click back on "Local Area Connection" and go to properties again.
16. Go back to the "TCP/IP" settings
17. This time, select "Obtain an IP address automatically"
18. Hit "Ok"
19. Hit "Ok" again
20. You now have a new IP address
With a little practice, you can easily get this process down to 15 seconds.
P.S:
This only changes your dynamic IP address, not your ISP/IP address.
How to remove virus BAR311.exe / pc_off.bat / photos.zip.exe or password_viwer.exe
Taskbar -> Processes tab -> END PROCESS bar311.exe OR password_viewer.exe or photos.zip.exe......
Go to (type in run) REGEDIT
GO to "HKEY_LOCAL_MACHINE\SOFTWARE\Microsoft\Windows NT\CurrentVersion\Winlogon" "Userinit"="userinit.exe,bar311.exe" remove "bar311.exe" and leave userinit.exe
is use to log in WINDOWS
Go to "HKEY_CURRENT_USER\Software\Microsoft\Command Processor
" DELETE "autorun"="c:\Windows\pc-off.bat"
DELETE "c:\Windows\pc-off.bat" OR DELETE the autorun key...
CONTROL SETTING --> FOLDER OPTION --> SHOW HIDDEN FILES AND FOLDERS
UNCHECK 2 box under it
GO TO
"C:\WINDOWS\bar311.exe" <~~~delete
or
"C:\WINDOWS\password_viewer.exe" <~~~delete
or
"C:\WINDOWS\photos.zip.exe" <~~~delete
and
C:\WINDOWS\pc-off.bat" <~~~delete
bar311.exe - is a trojan virus
pc-off.bat - annoying program it will execute CMD if you type in RUN
copy the url from youtube.com when playing the video
not the embedded
then go to www.keepvid.com
paste it in the search bar then click download
you will be ask what format would you like
most of the videos from youtube is .flv format
so you will need a flv player to play it
or download it as mp4 so you can play it in windows media player
thats it!
you need a program like vuze / azurues
open the program vuze then
go to www.torrentz.com then search the movie
then click download this torrent
choose from mininova / piratebay or mononova
after downloading the torrent double click it
and open with vuze or make it a default
and this will automatically download the movie
but it takes 6 hours to download / movie even you are using 1mbps connection
you may close the vuze then continue it later
1.Before you log in to rooms check the ENABLE ARMOR
2.Go to 'Options' - private messaging.
:change magic word to something else.
:check boxes
- Ignore PMs with URLs from non friends.
- Restrict PMs to friends only.
- Only allow PMs if they say 'The Magic Words'
UN-check all other boxes.
3. Go to 'Options' - Spam Filter.
:click "Strong"
4. When in the chatroom type these commands into the text box.
This was the secret commands of YAHE to engage his UNBOOTABLE MODE.
It was patched by YAHOO but it backs again...
- /wap
- /noipaddr
- /quiet
5. If you are getting booted use the "/debug 1" command to capture boot packets ....
then you can ignore and wildcard the bots......
copy the file .ocx or .dll then paste it in C:\WINDOWS\system32
then in start click RUN type in
regsvr32.exe xpcontrols.ocx <<<sample only it depends of what file you need to register in sytem32
or
regsvr32.exe yacscom.dll <<<sample only it depends of what file you need to register in sytem32
then reboot / restart your computer
simple!
download this file
AVI: 270.6.4
IAVI: / 1616
or download it from http://www.grisoft.com/ww.download-update
save it in your avg8 folder
C:\Program Files\AVG\AVG8
once you save it
open AVG from task bar
right click the avg icon then click OPEN AVG USERINTERFACE
click tools>>>update from directory
then go to
C:\Program Files\AVG\AVG8 AND CLICK "OK"
it should then allow you to update fine
Terms and Conditions
Disclaimer
References to "luzon18", "luzon18.tk" and "this
site" refer to the luzon18.tk website and all related websites, its owners
and any related companies.
By using the information, services and products available through this site and
downloading any software, you are agreeing to the terms and conditions
contained herein.
This site provides the information, services and products available "AS
IS", with no warranties whatsoever. All express warranties and all implied
warranties and non-infringement of proprietary rights are hereby disclaimed to
the fullest extent permitted by law.
This site is not associated with the software it provides for download and
cannot be held liable for issues or faults that arise from the download or use
of the software.
All content and graphics within this website are ©Copyright luzon18.tk